


I don't know about you, but I do not like carrying around a diaper bag. Especially when I have my huge mama purse with me too. So, when my baby was born, I made a diaper clutch just like this one, only now it isn't looking quite as fresh. With the clutch and a couple of toys crammed into my purse, I knew I was set to go. Whenever I decided I needed the whole diaper bag to make a trip, I would just put the clutch in there. That way I had all of my changing supplies in the same place. I also liked that I didn't have to put my sweet little baby's tush down on the public changing table that had previously had so many unknown hineys (spelling?) on it. And once again, this pattern is purely for home use only. Please do not take this and make or sell a pattern of it.

1/3 yd. outer fabric
1/3 yd. lining fabric
9"x12"square med weight iron-on interfacing
1/3 yd. clear vinyl (be sure to keep the tissue paper it comes with)
1/3 yd. cotton batting (something comparable to this)
1 magnetic snap (I used a 3/4" silver snap)
3 yds bias tape, about 7/8-1 inch wide
With the outer fabric and lining, I just used a standard 100% medium weight fabric. In the past I have used Home Decor Fabric, and it has worked great as well. Use whichever you would prefer, the Home Decor Fabric holds up to wear and tear a bit better, but the medium weight fabric seems to be a bit sleeker looking. For the vinyl, I just used a light-med weight. I didn't want to be too rough on my machine, and I think it folds better. As for the bias tape, I cheated and used Wrights, Wide Single Fold Bias Tape, but if you want to make your tape match perfectly you can make your own. I have found this tutorial useful for creating quick bias tape.

Cutting everything out:
I like to use my rotary cutter for this part, but good old fashioned scissors will work great too. You will need to cut a 33"x12" square from the following: inner fabric, outer fabric, batting, and vinyl. Cut a 9"x12" square of interfacing. Reserve any scraps of interfacing you may have for later.

Iron on interfacing:
Lay outer fabric right-side down in front of you. Measure 8" from one edge of fabric, place interfacing down on measured edge. (See picture for guidance.) The interfacing will help create a natural fold line, as well as allow for stability for your magnetized snap. Iron on interfacing using manufacturer's instruction.
If you have a scrap of interfacing remaining, lay out your lining fabric right side down. Place scrap of fabric at the center of one end of the fabric. As you can probably tell, I just eyeballed it. This will be for extra reinforcement for the complementary side of the magnetic closure. Iron on interfacing using manufacturer's instruction.

Attach magnets:
You will have two parts to your magnetic snap. You will place what I call the bottom part of the snap (The part that has the small whole for the other snap to fit into) onto the outer layer of fabric. Measure 13" from the same edge you had initially measure for placing the interfacing. Mark interfacing at 13". Then measure from the opposite edge down 6" to make sure you place the snap centered at the 13" mark. Attach magnet using package instructions. When you are finished it should look like this. (Sorry I didn't think about taking this picture until after I was finished with the project, whoops...)
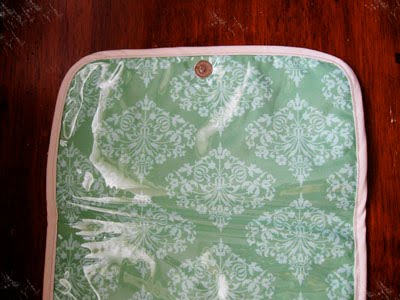

For the top part of the magnet. Measure about 1 inch from the edge of the lining fabric (if you attached interfacing scrap, use that end). Again, measure down 6" from the other edge to make sure your 1" mark is also at the center of width of the fabric. After marking this, I like to pin the vinyl down to the right-side of the lining, taking care to put the pins at the edge. That way you won't have a bunch of pin marks all over your beautiful vinyl. Place vinyl tissue paper to the side at this time. Attach complementary magnet end going through both the vinyl and the lining fabric. Again, refer to the package instructions for installation. When you are finished it should look like this. (Again, this picture was taken at the end of the project, sorry...)

Sew together all the layers:
Place outer fabric down before you, right-side down. Next, place batting on top of outer fabric, followed by the lining fabric right-side up, and the vinyl, and finally the vinyl tissue paper (the lining and vinyl should already be connected due to the magnet snap.) The vinyl tissue paper will help keep the vinyl from sticking to your presser foot. If your vinyl didn't come with tissue paper the gift wrap kind works great too. Pin all layers together, and sew a 1/4" seam. This seam will help keep everything stable for the next few steps.

Create a nice curved edge:
On the edge that you have previously attached the top snap, place a glass at the corner. Trace around cup to create nice curved edge. Cut all layers at curved line. I don't bother sewing a 1/4" seam around the curve since we will be attaching the bias tape soon, which will finish the edge.

Attach bias tape to pocket end:
Attach bias tape to end opposite of the curved edges end. This end will be used to make the pocket. If you are not sure how to sew on bias tape this website may be helpful. Use the directions for packaged bias strips.

Create pocket:
Fold over fabric about 8" so right-sides of lining meet (take care to remove tissue paper up to the top of your pocket so you don't have to fish it out later.) You should be able to feel where your interfacing starts on the outer fabric. Attach remaining binding closing pocket edges, as shown above. The bias tape should go around your curved edges nicely. I use my sewing machine to do the topstitching.
A finished clutch fits one travel wipe container (I buy either Huggies or Pampers since they are fairly flat) and about four diapers. Let me know if you make one, I would love to see what you make!! Please feel free to leave any questions or comments:)


Love this!!! Such great fabrics too.
ReplyDeleteI love the all in one idea! Great tutorial!
ReplyDeleteCami
I needed this tutorial when I had my babies!! I may make one for a friend! Love the fabrics you chose!
ReplyDeleteI love this!! I tried to make one recently but it didn't turn out this well! I am going to try yours now! Thanks for linking up! I am going to feature this later today! Make sure you grab a button!!
ReplyDeleteLove this idea...and I don't even have kids! Those fabrics are beautiful :)
ReplyDeleteKatie
moremisadventures.blogspot.com
Thanks for this tutorial!! I really need to make one of these... I have been procrastinating it for a while and now I have no more excuses!!
ReplyDeleteAlison
http://oopsey-daisy.blogspot.com/
This is adorable! I love the rounded corners. It makes gives it a really nice look. Thanks for visiting my blog! Hope to see you again soon!
ReplyDeleteJenn
Very cute! I love the fabric that you used! :)
ReplyDeleteI've made one of these before, but yours is a lot better than mine, i am now following your blog, hopefully you can do the same for me :0)
ReplyDeletemommy-at-work1.blogspot.com
I love how yours turned out, and I am attempting one right now. I think my batting is too thick though because I'm having the toughest time getting my machine to sew on the bias tape around the pocket with all the layers. What kind of batting did you use? I also found an even more helpful tutorial on bias tape at smashedpeasandcarrots.blogspot.com. It's not so intimidating/hard to work with now!
ReplyDeleteI just made one and, dare I say it, I can't wait to use it for the first time!
ReplyDeleteI was short on patience today so I used fusible fleece and iron-on vinyl to make it easier to keep everything lined up.
I might just have to make another so I can always have one full and ready to go!
I made one and loved it! Where would you like me to send the picture?
ReplyDeleteJust a note to let you know I have linked you in my article Frugal Road Trip with Kids http://www.morewithlessmom.com/index.php/2013/05/29/frugal-road-trip-with-kids-from-a-mama-pro/
ReplyDelete