6/24/10

asphalt pie


Whenever we are on the west coast, we like to get this little piece of heaven at Winger's. We love to get this dessert, it is super yummy. That is why I wasn't surprised when my husband requested we have it on Father's Day, and since he was considered King of the Day, I was happy to oblige. It is a fast and easy to make, and everywhere we have take it we have had requests for the recipe. Just be careful because it can be terribly addicting. I just had another piece about an hour ago, and I think it may be calling my name for a second. Don't worry, I just had a little first piece that way I can justify a much larger second piece, right?


Asphalt Pie 
1 (18oz) pkg            Oreo cookies
1/4 c                         butter, melted
       1 c                            hot fudge topping
                          2 qt                          mint chocolate chip ice cream


1. Crush half of the cookies (about 20) to crumbs. Combine crumbs with melted butter and press into the bottom of a 9" spring-form pan or pie plate. Stand remaining cookies around edge of pan. Spread 3/4c. fudge over crust. Freeze 15 minutes.


2. Meanwhile, soften ice cream in microwave or on counter top. After crust has chilled, spread softened ice cream over fudge layer, freeze until firm (4hrs-overnight). 


To serve, garnish with more hot fudge, whipped topping and cherries.


6/16/10

Cupcake Box Tutorial


Who doesn't love a cupcake? I had a friend who liked cupcakes because she didn't have to share, they come individually packaged. Well, whatever your reason may be cupcakes rock!! If you are looking for a fun way to give them to a friend, here is a quick tutorial on the making of a cupcake box. This box will house four lovely cupcakes rather comfortably. Just make sure to use a reasonably heavy paper, something equivalent to the thickness of card stock should work great.

All of the instructions are in the document below, but I thought I would include a picture of attaching the bottom portion to the top as I thought it might be a little confusing. Let me know if you have any questions.
 

Cupcake Box Tutorial

giveaways


6/8/10

edgy toddler top tutorial


My little Sweetie was short on cute tops for summer so I used some scraps from past projects to put this little one together. It was fast and easy, so I decided to put together a little tutorial for ya'll. Wish my little model were up from her nap, I would take a picture with her wearing it, you get the free store hanger instead!


For this project you will need:
                         W        L
Main Front:    15" x 10 1/2" piece
Main Back:      15" x 8 1/2" piece
Collar Fabric:   15" x 3" pieces(x 2)
Bottom Back:   15" x 3" piece
Bottom Front:   15" x 5" piece

Tie:                  2" x 45" piece (or 2 x the width of your fabric)
Coordinating Bias Tape (about 28")
Matching Thread

My finished shirt ended up being about a 2T. Just keep in mind that I mentioned the width and length above the piece sizes just in case you are working with a directional fabric.

All seams are 1/2" unless otherwise specified.
This pattern is purely for home use only. Please do not take this and make or sell a pattern of it.

Cut out fabric pieces:
Cut out your fabric pieces as indicated above. You should have one of each piece, except for the collar fabric where you should have two pieces.

Create front piece's bottom edge:
This is the trickiest part of the tutorial, and please keep in mind I am not a professional pattern maker. I would definitely brag about it if I was, but sadly I'm not.
 
Step One:
Hope the glare in this photo doesn't blind ya! I am a mother by day and a crafter by night, so my pics aren't the greatest. Anyway, I about 2" from the bottom edge of the 15" x 10 1/2" cut into the fabric 1/2", cutting out a 1/2" x 2" rectangle of fabric on both sides.

Step Two:
Measure 14 1/2" from the bottom left corner of fabric (starting at your newly made edge), mark fabric lightly on bottom edge. Line up ruler from top corner of newly made left rectangle to the marking, as seen in the photo below. Cut along this line.
Step Three:
Do likewise to the other side by lining ruler up at the top corner of newly made right triangle to the same marking. Cut along this line, giving you a nice corner. Your fabric piece should now look like the photo below.
Step Four: 
This part is to make the bottom edging for the front of the shirt. Place 5 x 15" bottom piece of fabric right-side down in front of you. Place front main piece of fabric right-side down on top of bottom fabric piece, so the right and left edges overlap about 1/2". Please see picture for details. Use a fabric pencil (or if your me a regular pencil) and trace along the bottom edge of the front fabric piece.

Step Five: 
Make a second line 1/2" above the initial line to create a 1/2" seam line.

Step Six: 
Create a third line three inches from top edge, as shown in the picture. Please don't mind the glare from the light, just as I am not a professional pattern maker, I am also not a professional photographer. 

Sew together front main and front bottom pieces:
Place main fabric right-side up in front of you. Place bottom piece right-side down, lining up top edge of right side of bottom piece with the right side bottom edge of main fabric piece as shown in photo. Pin in place. Sew from right edge to center.

Starting at center (where you left off stitching) pin bottom and main fabric pieces together making your way to the left edges. Sew seam. Clip corner of bottom fabric at center point as pictured to allow fabric to lay flat. Press.

Sew together back main and back bottom pieces:
Place back main fabric piece right-side before you, place back bottom piece wrong-side up on top of main piece. Line up top of bottom piece with bottom of main piece. Pin and sew.

Sew together main and collar pieces:
Place front main fabric piece in front of you right-side up. Place front collar fabric piece on top of main piece wrong-side up. Pin and sew. Do the same with back main and back collar pieces. Press both sides.

Iron in casing:
Place front main fabric piece wrong-side up in front of you. Fold top edge down 1/2" and press. Then maintaining previous fold, bring folded edge down again 3/4" fold. This should create a small casing. Do  not sew casing yet. Do likewise to back main fabric piece.

Create arm holes:
Place front main fabric piece wrong-side up in front of you, keeping casing fold in place. I used a large mat with a ruler for this part, but you could figure it out without one. Place a cd 5" from the top of the folded casing edge and 1 1/2" from left side raw edge, as shown in the picture. Place a ruler 1 1/2" from left raw edge. Using a pencil trace (beginning at top folded edge) along ruler until you meet the curve of the CD, at that point follow the CD to left raw edge. Do the same on right side of front main fabric, and also on left and right sides of back main fabric. Cut along line.


Sew on bias tape:
Unfold casing. Pin on bias tape, and sew on around each armhole. When you are finished your pieces should look like the picture below.


Sew in casing:
Refold casing, press again if needed. Sew seam 3/4" from top fold making sure to catch fabric, creating a 3/4" casing. Sew in both front and back piece casings. 

Sew together front and back pieces:
Place main front piece in front of you right-side up. Place main back piece on top of main piece wrong-side up. Starting at the bottom of either sides arm hole, pin down to bottom edge. Sew 1/2" seam. Do the same for the opposite side.


Hem bottom edge:
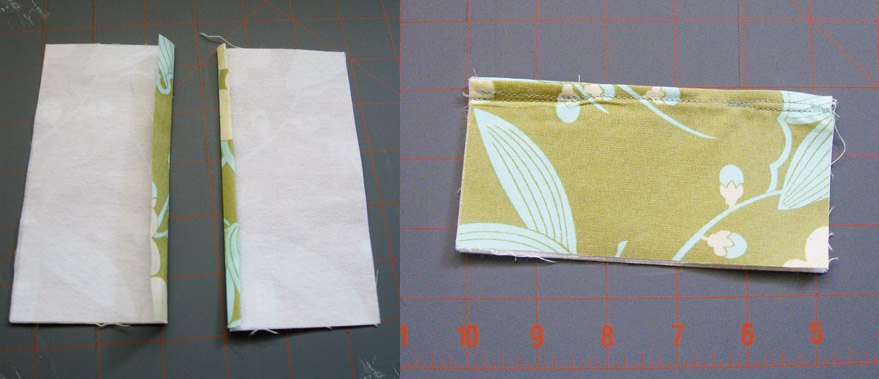
Fold bottom edge up 1/2", press. Open fold and bring raw edge to center of fold, creating a 1/4" seam. Press, pin and sew. 

Create tie:
Fold the 2 x 45" fabric piece in half lengthwise, press. Open fold, bring raw edges to newly created fold, press. Refold and press again. This should yield a 1/2" tube of fabric. Sew a seam to close tube. I didn't finish the ends since I was planning on knotting them. If you would rather have ties on both shoulders, you will probably need two 2 x 45" fabric pieces.
Feed tie through casing:
Starting on the side you would like your bow to be, feed tie through the front casing. When you reach the opposite end, feed tie through back casing so tie ends ends up on the side your bow will be. Adjust as desired, knot the tie ends, and tie a bow. Yay, all done!

I hope this tutorial is clear, please feel free to leave any questions or comments below.

giveaways


Life in my PJs


6/1/10

my golly dollies!!


With another one on the way, I really wanted my little girl to have a baby of her own, but she was afraid of the plastic ones from the store. If I tried to get her to play with one, she would go put it in a corner somewhere. So I decided to make her a dolly out of fabric that she could snuggle with it instead. I found a etsy shop online called emmis cottage that had adorable plush dolls. I wish I could have afforded to by the real deal, but maybe later. They are so adorable. She has a ton of different styles to choose from, and offers custom orders.


My version, not quite as cute but what can you say I'm a rookie:

5/26/10

raggy blanket, burp rags and taggy block tutorial

 
Well, vacations over so I guess it's time for that promised tutorial. None of these ideas are new, but I thought it may be helpful to have a all inclusive set of instructions to make this fun baby gift. Sometimes I think the hardest part is figuring out how much material to get, I much prefer the putting everything together part! For this project you will be making 1 Rag blanket, 3 burp rags and 1 taggy block. 

For this project I used:
1/3 yd of 5 coordinating fabrics (you should have 1 1/3 yds total)
1 1/3 yds fabric for backing
1 pkg. crib sized cotton quilt batting (enough to cut 49, 5" squares)
1/3 yd  terry cloth
Scraps of ribbon
Scrap of heat n' bond
stuffing for taggy block

You can use fewer than 5 fabrics for the front, but I wanted to be sure I didn't have any of the same fabrics adjacent to one another. Be sure to cut out fabric as I will show below to ensure you have enough fabrics for all of the projects.

Cutting your fabric: 

Five coordinating front fabrics: From four of the five 1/3 yd fabric pieces cut out a total of ten 6" squares. You will only need nine 6"inch squares from the fifth 1/3 yd fabric piece. From 3 fabrics cut a 7/12" piece for burp rags. From all five fabrics cut a 5" square piece for taggy block.

Fabric for backing: Cut 49, 6" squares from backing material. Also cut one 5" square for taggy block.

Cotton quilt batting: Cut 49, 5" squares for blanket. 

Terry Cloth: Cut 3, 12x7" pieces, for burp rag.
Whew, what a work out! When you are all done, your lovely stack of stuff should look like this:


Blanket 
Assemble quilt squares:

Next place one 6" backing square wrong-side up in front of you. Carefully place 5" batting piece centered on backing piece, you will have about a half inch of backing poking out of all sides. Next, place a 6" front fabric square right side up directly on top of batting piece. Continue until all of your 49 squares are assembled.

Sew your x's:
Next, sew a diagonal line starting about a half inch from the corner down to about a half inch away from the opposite corner. Sew a second line down opposite ends, leaving you with  hopefully a perfect x. You are welcome to measure for exactness, but my patience only let me go as far as to eyeball it and I was still happy with my results.

Sew your squares together:
This part trips me up every time I make one of these blankets. To make that cute little scraggly seam, you will need to sew each square wrong-sides together. Place first square wrong-side up before you, place second square right-side up directly on top. Pin in place, sew a 1/2" seam down side. Sew squares together until you have 7 strips with 7 squares in each strip. Be sure to sew squares in an order that won't have any of the same fabric fabrics touching. I laid out all of my squares on the floor and moved them around until I was happy with were I had placed each of them.

Sew strips together:
After you have conquered sewing your blocks into strips. Place one strip before you wrong-side up and lay the adjacent strip directly on top right-side up, pin in place. Sew 1/2" seam down entire side. Continue with remaining strips until you have a pretty blanket. 

Completing the deal:
To finish the outer edge on this blanket, I sewed a 1/2" seam around the perimeter. Next, using the point of your scissors, clip within 1/8" of the the seamline, continue along raw edges clipping about every 1/4"-1/2". Pop in a good movie for this part, it can take a while. I just clipped a few squares every time I got a minute throughout the day. Wash blanket to encourage raggedness.


Taggy Block

For the taggy block feel free to use your imagination for decorating each side. I only added something special to two sides and left the other sides to do their own magic. 

Heart square

For one side I appliqued a heart using the scrap of heat n' bond and a scrap of the backing fabric. I used a simple zig zag stitch to reinforce it.

Ruffle square:

For the other side, I added a small ruffle. To make ruffle take a 3"x12" strip of scrap fabric (it doesn't have to be that specific dimension, just kind of close).  Fold over long edge toward middle about 1/2", press. Repeat on opposite side. Next, bring raw edge toward fold, press. Repeat on opposite side. This should give you a 1/4" hem on both sides. Sew seam down edge.

Place strip down on desired 5" square. Ruffle as desired. Sew seam down center of ruffle to hold in place.

Assembling block: 

Getting started:

Once you have all your blocks ready for assembly. Start by placing one 5" square right-side up before you. pin on ribbon if desired. I folded my ribbon over creating a loop to avoid having raw edges that may ravel. Just place folded ribbon so raw edges of ribbon line up with the raw edge of your square. Your ribbon should be perpendicular to the squares raw edge. (If you would rather not loop your ribbon, you can always use heat to melt a raw ribbon edge, but I wasn't sure if it would hold if a baby sucked on it too much.) Place second square right-side down on top of first square and ribbon. Pin in place on one side. Sew a 1/2" seam down side, open and press flat. 


Make circle:
Continue sewing blocks together until you have a strip of 4 blocks. Sew first and last blocks together to form a circle of blocks, see photo for better description.

Top it off: 
Sew on top square. Finish by sewing bottom square on leaving about 3" open on one side to pull square right-sides out, and to stuff.
Finish it up:
Stuff block with desired stuffing. Hand stitch opening shut. Yeah! 


Burp Rags:

These are fairly self explanatory, but I took a picture just for kicks. 

Place 7x12" piece of fabric and matching piece of terry cloth right-sides together, pin in place. Sew a 1/4" seam around perimeter leaving about a 3" opening. Turn burp cloth right sides out. Press so opening edges are nicely tucked inside burp cloth. Sew a finishing seam around perimeter of burp cloth.These take about 5 minutes to make, yeah for quick projects.

This baby gift is so fun to put together! If you have any questions about anything, please leave a comment and I will try my best to describe it better.


giveaways


5/10/10

yay!! i'm on vacation:)

Sorry for the lack of posts lately, I have been on vacay and will be for another week. I am super excited to post a new tutorial I have been working on when I get back. Hope everyone is having a nice May!!

4/19/10

dirty diaper baggy holder tutorial


Through experience, I have discovered that diaper changes don't always happen at the most convenient times or places. I have also discovered the usefulness of having a bag to stick that dirty little gem in until I get home. Lets face it, I just don't like having to smell it. When I was making diaper clutches for a few friends having babies, I thought it might be handy to have a matching pouch to put some of those helpful dirty diaper baggies.

I made pouches using the scraps I had left over from the diaper clutch, and it only took me about 15 minutes total to cut it out and sew it together. Yes folks, it's just that easy!! Anyway these little cuties hold about 20 of the bags I found at the dollar store, and I think they are kind of adorable. I actually feel kind of bad that they are being used to hold something like doggy poop bags, but hey what do you do?

To do this project you will need:
Main fabric:
-(1) 5 1/4 x 4 1/2" piece
-(2)  5 1/4 x 3" pieces
-(1) 5 x 2" piece
Light Interfacing:
-(1) 5 1/4 x 4 1/2" piece
-(2) 5 1/4 x 2 1/2" pieces
thread

If you are using a heavier fabric, such as an outdoor upholstery you probably won't need to use the light interfacing. You can use a heavier interfacing, but it will be a lot stiffer, and harder to turn right-side out in the end. I just wanted to use interfacing since my fabric was fairly light, and I wanted it to be able to withstand some wear n' tear.

Cut out fabric and interfacing:
Not much explaining here. 5x2" piece is not shown here, it is used to create the hanging loop.

Iron on interfacing:
The larger square of fabric should line up nicely with the larger square of interfacing. As for the two smaller pieces of fabric (what I will call the front pieces), line the interfacing up to one side of the fabric. To compensate for my lack of descriptive skills, please refer to the very boring picture above.

Create small hem:
On both front pieces, fold over remaining fabric edge and iron in place. Then bring edge to newly created fold and again iron in place, creating a small hem. Again I have included a more descriptive picture that hopefully worth its thousand words.

Create front side:
Place the two finished front pieces wrong-sides together, so that hems meet. Sew a 1/4" seam starting from each end, continue until you have reached 1 1/2" toward the center. This should leave you about a 2" opening. This is where you will be able to pull out those lovely bags. Yes, I know my seams are pretty crooked, but I am happy to say they can still serve their purpose.

Press open:
Press front piece open. I pressed each seam to the opposite direction at either end. That will prevent the seam from folding to one side. Set front piece aside.

Sew strap for loop:
The loop is optional, but honestly I think it looks nice. If you would like to make a strap, take your 5x2" piece of fabric and fold it in half length-wise, press. Open fabric up, and bring both edges to the newly created center fold, press. Sew a top-stitch down edge opposite of fold creating a 5" strap. Fold strap in half, and set aside.


Bring it all together:
Place 5 1/4" x 4 1/2" piece of fabric right-up in front of you. Choose one corner and place folded strap diagonally across large fabric piece. Your straps unfinished ends should slightly extend past the corner of the large fabric piece. Then, place front piece down so the wrong-side is facing you. Pin together. Stitch a 1/2" seam all the way around. Trim edges to about 1/4" and clip corners. Turn right side out.

Hooray, all done!! Now all you need are those dirty diapers:)


giveaways


DIY Day @ ASPTL


Photobucket