Through experience, I have discovered that diaper changes don't always happen at the most convenient times or places. I have also discovered the usefulness of having a bag to stick that dirty little gem in until I get home. Lets face it, I just don't like having to smell it. When I was making diaper clutches for a few friends having babies, I thought it might be handy to have a matching pouch to put some of those helpful dirty diaper baggies.
I made pouches using the scraps I had left over from the diaper clutch, and it only took me about 15 minutes total to cut it out and sew it together. Yes folks, it's just that easy!! Anyway these little cuties hold about 20 of the bags I found at the dollar store, and I think they are kind of adorable. I actually feel kind of bad that they are being used to hold something like doggy poop bags, but hey what do you do?
To do this project you will need:
Main fabric:
-(1) 5 1/4 x 4 1/2" piece
-(2) 5 1/4 x 3" pieces
-(1) 5 x 2" piece
Light Interfacing:
-(1) 5 1/4 x 4 1/2" piece
-(2) 5 1/4 x 2 1/2" pieces
thread
If you are using a heavier fabric, such as an outdoor upholstery you probably won't need to use the light interfacing. You can use a heavier interfacing, but it will be a lot stiffer, and harder to turn right-side out in the end. I just wanted to use interfacing since my fabric was fairly light, and I wanted it to be able to withstand some wear n' tear.
Cut out fabric and interfacing:
Not much explaining here. 5x2" piece is not shown here, it is used to create the hanging loop.
Iron on interfacing:
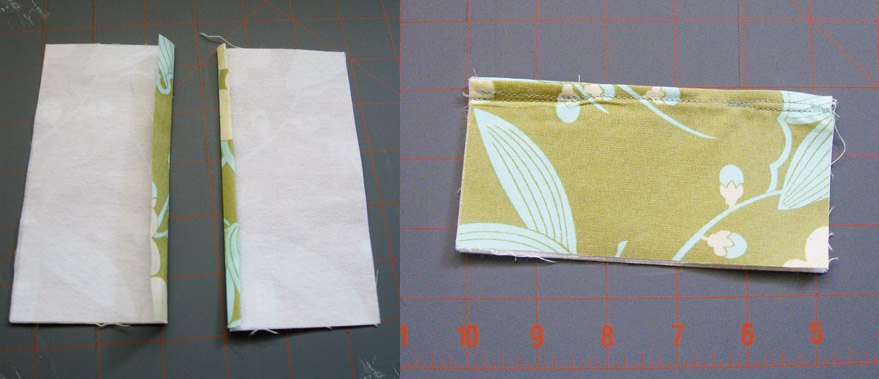
The larger square of fabric should line up nicely with the larger square of interfacing. As for the two smaller pieces of fabric (what I will call the front pieces), line the interfacing up to one side of the fabric. To compensate for my lack of descriptive skills, please refer to the very boring picture above.
Create small hem:
On both front pieces, fold over remaining fabric edge and iron in place. Then bring edge to newly created fold and again iron in place, creating a small hem. Again I have included a more descriptive picture that hopefully worth its thousand words.
Create front side:
Place the two finished front pieces wrong-sides together, so that hems meet. Sew a 1/4" seam starting from eachend, continue until you have reached 1 1/2" toward the center. This should leave you about a 2" opening. This is where you will be able to pull out those lovely bags. Yes, I know my seams are pretty crooked, but I am happy to say they can still serve their purpose.
Press open:
Press front piece open. I pressed each seam to the opposite direction at either end. That will prevent the seam from folding to one side. Set front piece aside.
Sew strap for loop:
The loop is optional, but honestly I think it looks nice. If you would like to make a strap, take your 5x2" piece of fabric and fold it in half length-wise, press. Open fabric up, and bring both edges to the newly created center fold, press. Sew a top-stitch down edge opposite of fold creating a 5" strap. Fold strap in half, and set aside.
Bring it all together:
Place 5 1/4" x 4 1/2" piece of fabric right-up in front of you. Choose one corner and place folded strap diagonally across large fabric piece. Your straps unfinished ends should slightly extend past the corner of the large fabric piece. Then, place front piece down so the wrong-side is facing you. Pin together. Stitch a 1/2" seam all the way around. Trim edges to about 1/4" and clip corners. Turn right side out.
Hooray, all done!! Now all you need are those dirty diapers:)
First of all, I just want to say thanks for everyone who has stopped by my blog, it is so fun to read all of your comments!
I have another tutorial in the making, but for this post I just wanted to share some of my favorite past projects with you. I love searching for inspiration on blogs, people are so creative out there!!
Heather Bailey's blog always makes me smile with its bright welcoming colors, and when I saw these adorable pinwheels I knew they would bring some sunshine into my little one's room! When I was linking this picture to Heather's blog, I noticed I left out the center part of the pinwheel, oops! I think I will take them apart and add my missing centers:)
Another craft for my little sweetie's room is this flower wreath from Second Sister. I loved the spring colors, and the breath of fresh air it offered. I will say, I would be happy to never paper-craft another flower for the rest of my life after this project. But I always seem to find myself clicking on random paper flower posts so I guess the fetish may not be over!
This purse was one of my first endeavors crafting something besides clothing with my sewing machine. I found detailed directions at this link. The instructions were so clear, it was a cinch to put together. I also felt so professional using magnets and metal rings to make a project:)
I don't know about you, but I do not like carrying around a diaper bag. Especially when I have my huge mama purse with me too. So, when my baby was born, I made a diaper clutch just like this one, only now it isn't looking quite as fresh. With the clutch and a couple of toys crammed into my purse, I knew I was set to go. Whenever I decided I needed the whole diaper bag to make a trip, I would just put the clutch in there. That way I had all of my changing supplies in the same place. I also liked that I didn't have to put my sweet little baby's tush down on the public changing table that had previously had so many unknown hineys (spelling?) on it. And once again, this pattern is purely for home use only. Please do not take this and make or sell a pattern of it.
What you will need:
1/3 yd. outer fabric
1/3 yd. lining fabric
9"x12"square med weight iron-on interfacing
1/3 yd. clear vinyl (be sure to keep the tissue paper it comes with)
1/3 yd. cotton batting (something comparable to this)
1 magnetic snap (I used a 3/4" silver snap)
3 yds bias tape, about 7/8-1 inch wide
With the outer fabric and lining, I just used a standard 100% medium weight fabric. In the past I have used Home Decor Fabric, and it has worked great as well. Use whichever you would prefer, the Home Decor Fabric holds up to wear and tear a bit better, but the medium weight fabric seems to be a bit sleeker looking. For the vinyl, I just used a light-med weight. I didn't want to be too rough on my machine, and I think it folds better. As for the bias tape, I cheated and used Wrights, Wide Single Fold Bias Tape, but if you want to make your tape match perfectly you can make your own. I have found this tutorial useful for creating quick bias tape.
Cutting everything out:
I like to use my rotary cutter for this part, but good old fashioned scissors will work great too. You will need to cut a 33"x12" square from the following: inner fabric, outer fabric, batting, and vinyl. Cut a 9"x12" square of interfacing. Reserve any scraps of interfacing you may have for later.
Iron on interfacing:
Lay outer fabric right-side down in front of you. Measure 8" from one edge of fabric, place interfacing down on measured edge. (See picture for guidance.) The interfacing will help create a natural fold line, as well as allow for stability for your magnetized snap. Iron on interfacing using manufacturer's instruction.
If you have a scrap of interfacing remaining, lay out your lining fabric right side down. Place scrap of fabric at the center of one end of the fabric. As you can probably tell, I just eyeballed it. This will be for extra reinforcement for the complementary side of the magnetic closure. Iron on interfacing using manufacturer's instruction.
Attach magnets:
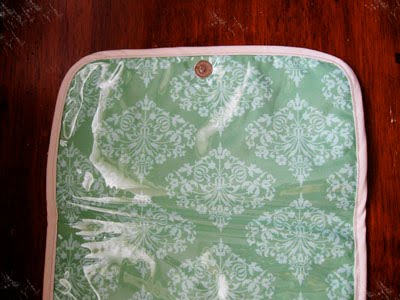
You will have two parts to your magnetic snap. You will place what I call the bottom part of the snap (The part that has the small whole for the other snap to fit into) onto the outer layer of fabric. Measure 13" from the same edge you had initially measure for placing the interfacing. Mark interfacing at 13". Then measure from the opposite edge down 6" to make sure you place the snap centered at the 13" mark. Attach magnet using package instructions. When you are finished it should look like this. (Sorry I didn't think about taking this picture until after I was finished with the project, whoops...)
For the top part of the magnet. Measure about 1 inch from the edge of the lining fabric (if you attached interfacing scrap, use that end). Again, measure down 6" from the other edge to make sure your 1" mark is also at the center of width of the fabric. After marking this, I like to pin the vinyl down to the right-side of the lining, taking care to put the pins at the edge. That way you won't have a bunch of pin marks all over your beautiful vinyl. Place vinyl tissue paper to the side at this time. Attach complementary magnet end going through both the vinyl and the lining fabric. Again, refer to the package instructions for installation. When you are finished it should look like this. (Again, this picture was taken at the end of the project, sorry...)
Sew together all the layers:
Place outer fabric down before you, right-side down. Next, place batting on top of outer fabric, followed by the lining fabric right-side up, and the vinyl, and finally the vinyl tissue paper (the lining and vinyl should already be connected due to the magnet snap.) The vinyl tissue paper will help keep the vinyl from sticking to your presser foot. If your vinyl didn't come with tissue paper the gift wrap kind works great too. Pin all layers together, and sew a 1/4" seam. This seam will help keep everything stable for the next few steps.
Create a nice curved edge:
On the edge that you have previously attached the top snap, place a glass at the corner. Trace around cup to create nice curved edge. Cut all layers at curved line. I don't bother sewing a 1/4" seam around the curve since we will be attaching the bias tape soon, which will finish the edge.
Attach bias tape to pocket end:
Attach bias tape to end opposite of the curved edges end. This end will be used to make the pocket. If you are not sure how to sew on bias tape this website may be helpful. Use the directions for packaged bias strips.
Create pocket:
Fold over fabric about 8" so right-sides of lining meet (take care to remove tissue paper up to the top of your pocket so you don't have to fish it out later.) You should be able to feel where your interfacing starts on the outer fabric. Attach remaining binding closing pocket edges, as shown above. The bias tape should go around your curved edges nicely. I use my sewing machine to do the topstitching.
A finished clutch fits one travel wipe container (I buy either Huggies or Pampers since they are fairly flat) and about four diapers. Let me know if you make one, I would love to see what you make!! Please feel free to leave any questions or comments:)
I know I just posted a skirt tutorial, but I guess spring puts me in the mood for making fun outfits. Sorry about the sad little picture. My model was napping, and I just couldn't wait to post it. Don't you just love the shoes though? Thanks Grandma, your the best:) Anyway, I made this skirt using the Sydney's skirt tutorial from the Polka Dot Chair, with a couple of modifications. I love this pattern, this is the third skirt I have made using this pattern and I am never disappointed.
I realize these modifications probably don't take an expert seamstress to figure out, but I thought I would post them just in case someone was interested. Sometimes I just like to find a similar similar project another person has made to get a little reassurance that I probably won't end up wasting a bunch of supplies. Anyway, feel free to use this information if you would like.
First, I didn't want this skirt to be quite so ruffly. So, instead of doubling the 'skirt top' pieces, I measured my daughters waist say 18" divided it in half (9") and added them together giving me 27". I followed the tutorials directions for the remainder of the measurements, except for the 4 skirt ruffle pieces. For those, I cut out four 6x44" strips from my tulle. You can cut out more strips of tulle if you would like the bottom ruffle to be more full, but I wouldn't suggest cutting any fewer since I think it would be in danger of coming out kind of skimpy. Also cut a piece of ribbon as long as the length of your waistband strip.
Follow the steps of Melissa's tutorial until you get to the directions regarding sewing the ruffle pieces. Sew all four ruffle pieces so you have one large hoop of tulle. Be careful that all of your seams face the same direction, this can be a little tricky when using tulle. Now, instead of hemming the bottom of the fabric, fold the tulle in half. Sew a basting stitch at about 1/4"-3/8" from the cut edges of your folded tulle. This should create a nice folded edge at the bottom. Gather using the basting stitch so that you have a nice ruffle. Continue with Melissa's tutorial.
When you reach the directions for the waistband, take your waistband strip. Fold it in half lengthwise, right-sides out. Place ribbon down on folded band. Determine where ribbon would look best, keeping in mind that you will need about 1/2" of the bottom edge (away from the fold) to sew waistband to skirt. I ended placing my ribbon about 1" away from the bottom edge. Sew ribbon to waistband piece. Continue with tutorial.
I hope these directions are clear. If you have any questions or a comment, please feel free to share.
One of my favorite things to sew are little skirts for my little sweetie! It is so much fun to pick out the fabric, and putting it together is a snap. As I have mentioned before I just adore this Matilda Jane skirt. So, while I can't afford the $40 price tag (maybe someday), with a little sweat I can make this one for around $10. I bought fabric from the Amy Butler Midwest line, it is a little more expensive, but I couldn't resist. This A-Line pattern fits my little girl perfect, and she wears 18-24 month clothes, so I figure that is about what size it is. It does fit her a little big, so it may be closer to a true 24 month size. With an 18 month old always on the move, a rear view is the only picture I could get with the finished project. If I can get another I will post it later.
A couple of disclaimers here. First, this is the first skirt pattern I have drawn up myself and also this is the first full-blown tutorial I have ever written, so please be patient with my inadequacies. Feel free to comment with any questions you may have, and I will be sure to answer them the best I can. Second, this pattern is purely for home use only. Please do not take this and make or sell a pattern of it. Okay, with those things said, lets have some fun!
*If you aren't sure about sizing, cut and sew the lining first. That way if it doesn't fit the way you like, you can make adjustments to the part nobody will see first, and then apply those adjustments to the outside layer. (Saving you $$$$).
What you need:
1/2 yd. main fabric
1/4 yd. main fabric for waistband
1/2 yd. lining fabric
1/8 yd. light interfacing
1 small invisible zipper (preferably that matches the main fabric)
matching thread
needle (for hand stitching)
I chose a light cotton for my main fabric, but anything that drapes well should work fine. For the lining, I just got some broadcloth off of the sales rack. You can use your main fabric if you choose, but since no one is going to see it broadcloth or muslin would be fine too. As for the zipper size, you can probably buy any zipper size you want, you only need about 5 inches of it. I just bought the smallest one they had.
One more thing... I made my skirt with an off-setted waist, but it is a little trickier. So if it is something you would rather not do, just use the lining pattern sheets to cut out your main fabric also and throw out the main fabric sheet. You can use the main fabric band pattern pieces to cut out your interfacing.
*All seam allowances are 3/8"
Print and assemble pattern:
While printing, be sure that the Scaling section on your print screen is set to NONE, if not your pattern pieces may print out the wrong size. Each pattern piece, except for the waistband pieces have both an A and a B piece. Line up the lines and tape together.
Cut out your fabric:
Sorry, I was so excited to get going on this project, that I forgot to take a picture of how I placed the pattern on the fabric. Luckily I had some extra to take a pretend picture, then I won't have to try to paint a picture with words, like my English teacher was always trying to get me to do. Line up all of the pieces to the fold, and cut out what it says on the pattern piece. You should have 1 main fabric front, 1 main fabric back, 1 main fabric band front, 1 main fabric band back, 1 lining front, and 1 lining back.
Iron on interfacing:
If you are making the alternate color waist, iron interfacing onto the wrong-side of the fabric of each coordinating front and back main fabric band piece. If you are doing a solid skirt line the interfacing up to the top of the coordinating front or back main fabric piece and iron on. If you are sewing a skirt without the waistband, go ahead and skip to sewing the lining, just use the lining directions for your main skirt fabric (make sure to place the zipper in the main skirt fabric, which is the step before making the lining). If you are braving the waistband please proceed...
Sewing the main fabric pieces...
Sew front main fabric piece to front main fabric band piece:
Place the front main fabric piece right side up onto a flat surface. Widest part should be laying closest to you. Place long straight edge of main fabric band piece right side down on top for front main piece (Darts should be opposite of the main fabric top edge). Line up band piece to the top left corner of the main fabric piece. Pin band piece to main piece starting at the far left, and stopping at the center. You may need to aid the fabric around the curve. Sew as much as you have pinned. Come back to the flat surface, and continue pinning the remainder of the way around the edge. Again aiding the fabric around the curve. Finish sewing along the line. Press the garment so newly sewn seam is nice and flat, if not your darts may look like the 18 month old made them.
Sew in darts:
Using the front and back lining pattern pieces. Mark your darts onto the main fabric pieces you just constructed. Sew in the darts. Sewing in those little triangles will help make the skirt more fitted. Here are some pictures, if you know what you are doing- by all means have at it. If you are a little apprehensive here is a tutorial that will have you going in a flash.
Sew front and back main pieces together:
Once your darts are sewn in, place the front and back main fabric pieces right side together. Pin both side seams. Make sure to leave room on one of the sides for the zipper. Where I placed my zipper is shown on the lining pattern pieces. Sew together front and back main pieces, again making sure to leave room for the zipper on one side. Viola!
Hem main pieces, if ya wanna:
This is where I hemmed my main pieces. I thought it would be easier to do it now before it was connected to the lining. Less fabric to try to handle. If you are a very meticulous person, you can wait to do this until the very end, just in case the lining causes it to sit differently. With my fabric selection, I just bit the bullet and decided to just go for it. I turned the bottom under 1/4" and then again 1/4" and pressed. Then I sewed it down.
Place zipper:
Blah!! This is always the worst part for me, but together we can make it through. Just follow the directions on the package, ha ha I bet you thought I would have more helpful advice. But seriously, zipper making company is much better at explaining things than I am.
Sewing the lining...
If you made it through the main fabric instructions this should be easy.
Sew in the darts:
Sew in the darts for both the front and back pieces. Please see "sew in the darts" section of the main fabric (4 steps back) if you would like more guidance.
Sew front and back lining pieces together: Just like you did with the main fabric pieces. Place right sides together of you lining pieces. Pin side seams, make sure to leave room for the zipper on the opposite side as you did your main fabric pieces. Sew side seams.
Sew together main fabric and lining skirts: By this time, you should have two dazzling skirts, as shown in the picture above. Line up the top edge of both the front sides of the skirts, right sides together. Starting from the closed side seam, pin along one side of skirts, pinning them together (ending with zipper opening). It should line up nicely. Sew a 3/8" seam around pinned edge. Starting from center again, pin opposite side down to zipper opening. Sew. Tuck lining skirt, down into main skirt. Press, be sure to press the zipper opening in the lining so the creases are prominent.
Hand stitch the lining zipper opening: Take a needle and thread, and stitch the edges of the lining's zipper opening to the zipper in the main fabric. It just looks nicer that way.
Top Stitch: Top Stitch around the skirts waist, just to help keep the waist looking sharp. If you don't, you may have problems with the lining creeping up.
Hem skirt lining: Turn under twice and press skirt lining bottom edge. Be sure lining is a bit shorter than your main fabric skirt, so you can't see it. Sew around edge.
Whew, all done. All that is left to do is admire your hand-work which honestly is my favorite part. If you have any questions about this tutorial, please leave a comment. Also, I would love to see pictures of anyone else that makes one. Thanks for taking the time to view this post:)
Welcome if you found your way over from any of these fabulous links:)
I usually don't try for giveaways, but I think these pieces of jewelry are beautiful. Head on over to this link and leave a comment to enter the giveaway. You can't tell me you wouldn't just love to have anyone of these creations by Lisa Leonard, cuz I wouldn't believe ya!
I love Hawaii, I would live there if I could. Palm trees, fresh mangoes, and 80 degree weather practically everyday, who wouldn't love it? It's too bad plane tickets cost more than the $10 I have in my sock drawer. When we found out we were having our first baby, I knew it would be a long time until we could go on a vacation just the two of us. I also knew we didn't have the time or the money to go on a vacation before the little bundle came. So I decided to create Hawaii in our living room. It was much cheaper than flying, and with the lovely invention of the thermostat 80 degrees became a possibility (even though we decided to keep it at the standard 72 degrees.)
Of course you have to have plane tickets to get to Hawaii, so I snuck these into my husband's bag before he left for school. Just to give him something to look forward to when he got home. These were the dark pre-Photoshop days, so I made them in one of the Microsoft Office programs.
I decorated the apartment with all of the Hawaiian beads and paraphernalia we got on a past trip. I also splurged and bought a $3 tabletop tiki torch from Michael's for the table centerpiece. I placed sea shells and tropical fruit (pineapple, mangoes, bananas, etc.) around the torch. Sorry for the lack of pictures, I didn't think about needing them for a blog later on.
Family Fun Version
My Version
I also made these cute flowers from cupcake liners. I got the idea from a family fun magazine, and just kind of changed them a little to make them my own. I actually made a few of both. The flowers from family fun worked well to prop up on objects around our house. They would look cute strung for a lei, or a garland. My version worked well to lay on the tables, couches, etc. I also used them in the centerpiece. They do take some time, so plan ahead. Here is the original flower link Family Fun.
For dinner we had Cafe Rio. If you are from the west coast, or have visited the west coast you may know the restaurant I am referring to. It is awesome!! We love it, and since we don't have one nearby, we miss it. Terribly... So we found various recipes online and make it ourselves. It isn't technically a Hawaiian dish, but it has pork as an ingredient so I let it slide.
Since I don't personally have a good picture, and since there is not a Cafe Rio to be found withing city or state limits I had to borrow a picture. This one is from Favorite Family Recipes, I haven't tried their Cafe Rio recipes, but I did use one of their recipes for dessert. Judging by other recipes I have tried on their site, I'm sure their version of Cafe Rio is delicious.
For dessert we had...
Pineapple Delight!! I just used a little fruit from the centerpiece. This is a more truly Hawaiian dish, it is similar to the awesome tropical fruit ice cream you get at the Polynesian Cultural Center. When we went to the PCC my husband and I both had two each. Hey, it's not everyday you are in Hawaii.
Even though we didn't actually get to go to Hawaii, my husband was still happy to have a night that I had planned especially for him. I would like to do another one for him soon, this time I will be sure to take pictures.
Being the wife of a resident, I have a lot of time to contemplate the workings of the universe. Since I'm not that into deep thinking, I use that time to craft instead. Since my husband is an intern, I do a lot of my crafting on a tight budget. Thus, the name Closet Crafter, because I wish I had a closet to craft in (I don't even get to think about a craft ROOM for at least 5 more years). But for now, I will continue to clutter up the living room making it fairly unlivable.